IDEXX Cornerstone Software
News and information
It’s been a busy day, but everything has gone smoothly and you’re about to head home. Then as you check the Daily Deposit report to prepare to run end of day, something is off. Don’t panic, Team Cornerstone is here to help! Let’s dig in on how to find those transactions quickly and get them righted so you can call it a day.
Step 1: Finding payment errors in Cornerstone
When the Daily Deposit Report doesn’t match your drawer, use the current period’s Daily Payment Register by Payment Type report to review detailed payment records and locate the culprit.
The most common payment errors are the incorrect amount was entered or a different payment type selected than what was used for the transaction.
Tip: Did you know that using right-click in the payment window’s amount field and our integrated payment option is a great way to reduce payment errors?
Why is the payment on the report, but not in my drawer?
If the payment is physically missing (payment is not in drawer but on Payment Register) it’s likely tucked under a keyboard or in another drawer. This is a key benefit of cashier IDs: you know who to ask!

All the transactions are accounted for on the reports, but my drawer is still over. Now what?
In some cases, the payment is in the drawer but not on the deposit or register reports. The most likely cause here is an unposted (saved) transaction. Checks and card slips make it easier to track down and post the corresponding transaction. To view all the day’s account transactions that have been saved and posted, the Itemized Audit Trail report is your go-to.
Tip: Check the Daily Planner Invoices tab to quickly see all saved invoices!
Step 2: Fixing different types of errors
It’s always best to fix transaction errors in the same daily period as they occur. Otherwise, Corrections will appear on the daily period they are performed in.
Tip: Do a midday/shift drawer balance. Catch and fix any discrepancies early and save time later!
In most cases it is a matter of entering a new payment after reversing or voiding the incorrect amount/type 1, 2. When a payment error surfaces:
- First determine if the payment was posted along with an invoice or is a “standalone” payment.
- Then follow your own practice’s guidelines to include or exclude corrections on invoice reprints and Client Account History reports with these best practice steps:
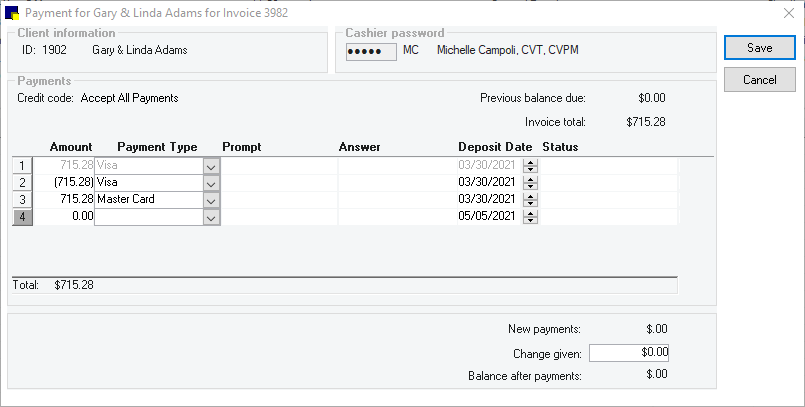
How to fix a payment on invoice error
Option 1 (invoice reprints reflect original and corrected payment(s))
- From the Client Account window, double-click the invoice associated with the payment error.
- Click Payment and enter your cashier ID (if using) and TAB.
- Enter a new payment row for the same amount and type as a negative, using the original payment entry for reference.
- Now enter the correct amount and payment type on the next payment line.
- Verify the change given and balance after payments is correct.
- Click Save on the payment window and then Cancel on the invoice window.
Note: you can also click the incorrect payment row and then use Ctrl-D to void the payment. While this method can omit the voided payment from the client account history report, invoice reprints will still display all payments.
Option 2 (invoice reprints retain original payment information only)
- From the Client Account window, click Payment.
- Enter your cashier ID (if using) and TAB.
- Enter same payment amount and type as original payment but enter as a negative amount.
- On next payment line, enter the correct amount and payment type.
- Verify the change given* and balance after payments is correct and click Post.
* reverse change given by entering as a negative value
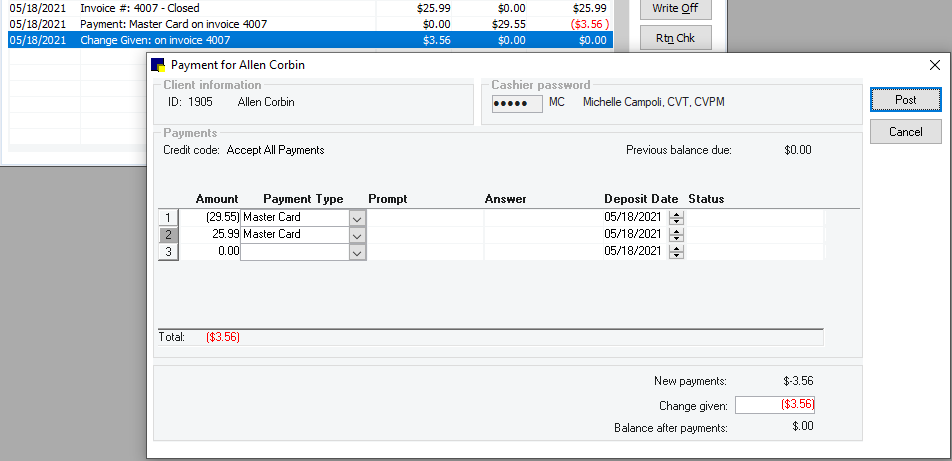
How to fix a payment on account error
Option 1 (all transactions display in the Client Account window and History report)
- From the Client Account window, click Payment.
- Enter your cashier ID (if using) and TAB.
- Enter same payment amount and type as original payment but enter as a negative amount.
- On next payment line, enter the correct amount and payment type.
- Verify the change given* and balance after payments is correct and click Post.
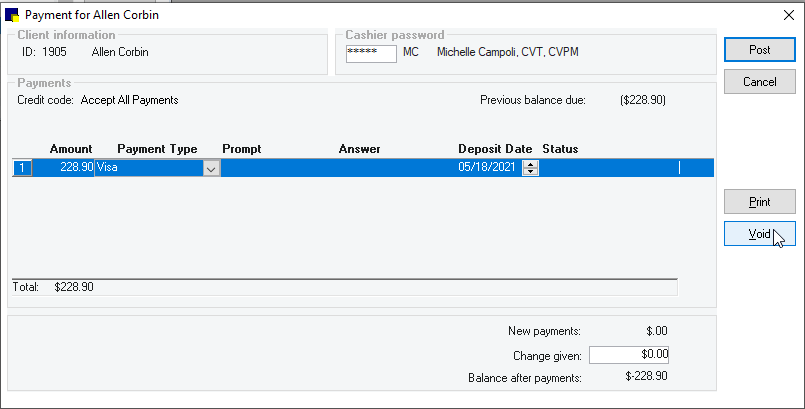
Option 2 (voids can be omitted from the Client Account window and History report)
- From the Client Account window, double-click the incorrect payment.
- Enter your cashier ID (if using) and TAB.
- Click the payment row and then click Void.
- Click Post.
- Now enter and post a new payment with the corrected amount and payment type.
Footnotes
1MLSD only: log in as original transaction practice to reverse or void and perform corrected payment entry under the appropriate practice to have transactions appear on correct practice reports.
2A/R by provider only: if Invoice defaults are set to have payments applied to specific invoices, you will need to void both the invoice and associated payment and re-enter both with corrected payment information in order for the A/R and Productivity by Staff reports to accurately calculate paid totals for the doctor on the posted invoice. When prompted to “Apply Charges To Staff”, select the staff from the original transaction for accurate provider accounts receivable balances and paid totals!

Michelle Campoli, CVT, CVPM
Michelle Campoli loves teaching people how they can do more with Cornerstone. When she’s not sharing her favorite tips and tricks in one of our Cornerstone user group meetings, Michelle enjoys spending time with her husband, cat, and retired greyhounds; playing in her kitchen and volunteering for her local greyhound adoption group.